
Behind The Scenes: Taking Photographs for the Blog!
Recently, I posted a picture of my new tripod on Instagram and got some responses that led to the creation of this post. I’ve also gotten a few emails of people asking what camera I shoot with, how I set up my shoots, what lighting products do I have, etc. So this post was born, and I hope it helps answer all your questions if you’re a blogger, shop owner, or just want to get better at taking pictures! Disclamer: I’m no expert and this is just my experience and what has worked well for me.

BLOG PHOTOGRAPHY LOVE LIST
Camera: I have an older version of this Canon Rebel camera. It’s a DSLR camera, and the best thing I ever did for my pictures! If you already own a Nikon, there are similar lenses for Nikon as well – the ideas are the same.
Lenses: I used the lens that came with my camera for a bit but quickly learned about the 50 mm f/1.4 lens. I shoot about 80% of the photos for this blog (and my freelance work for companies) with this lens. It is amazing. There is also the less-expensive 50mm f/1.8 which is a great alternative (essentially the same thing for our purposes). One step beyond that is my macro lens (Canon 100 mm f/2.8). If you want to shoot close ups (very close ups) of food or your products, this lens is a life-saver. I found that my 50mm f/1.4 couldn’t get too super close-up to my subject (ex. a cupcake) and still be able to focus. The lens that came with my kit didn’t provide the pretty “blur around the cupcake” look that is so pretty. Thus, the Canon 100 mm f/2.8. It can literally see dots of nutmeg in a cake (amazing).
Tripod: I used to have this Manfrotto tripod set, (it is great), and it sat in my studio for nearly a year because I felt “chained down” when I first tried it. I didn’t like it one bit. Now, I think it’s the single best improvement-maker to my photography. I feel “naked” without my tripod. Someone once described tripods in this way: they help you “build a shot” rather than “hope you get a good shot”. You can get your angle, then move around props until you love what you see. It ensures CLEAR pictures too. Just trust me! Anyway, I just bought this Manfrotto 055xproB with 322RC2 Joystick and LOVE it. They’re both really similar (the 055xproB can go a bit taller, hold a heavier lens, etc). What I LOVE about both these is that they can shoot OVERHEAD! You know those amazing shots of stationery sets or cookies on a pan that are shot straight down? Yep, these tripods can do that!
Lighting: Natural lighting is best, but I need a little help so I have this set of Soft Boxes. I’m sure any similar soft box set would be fine (you can read the details of it in the product description). The worst thing I have found for shots is only relying on your natural house lighting (which has a yellow cast to it). These soft boxes save my life when it’s dark, rainy, or I need a little extra boost of light. Turn off your house lights. Off, off, off. Use natural window light and a soft box to help (or you can bounce light off a piece of white foam board). Drag a table to the window (see below for my set-up).
Backdrops & Props: This could have its own post but basically – this depends on what you’re shooting. I’m shooting little DIY ideas, party food, and sometimes full tablescapes. I have a studio room as my office with a walk-in attic that contains tons of props. I also created my own backdrops to change out backgrounds. I buy wood from the hardware store and use paints, etc to create backgrounds. Then I use a lot of napkins/fabric (like these from Anthro) and cake stands (I love white because it goes with everything), dishes. Leave a message below if you’re interested in more about this and I’ll do a post on this.
“Accessories”: These are a few things that make my shoot days my favorite days! Comfy clothes for stepping over the tripod, climbing on a stepstool to look down on a shot, etc. Caffeine! Diet Pepsi is always within a few feet away. Music! Chris (hubs) got me this Beats Pill and it syncs wirelessly to my iphone where I have pandora, music, etc. It helps the creativity flow!

The recipe I’m shooting in this post will be posted later so you can see all the pics! 1 pic is below.
This is a picture I took on my iphone today. You’ll see my tripod and camera set in overhead position. This is my breakfast room. I pull out the chairs for shoots. I drag the table closer to the window. It actually looks quite bright but surprisingly it wasn’t, and I had my soft box on just on one side. If it’s dark or nighttime I’ll put a softbox on each side of the table. Then I pick my backdrop (today was a pretty aqua wood board I painted) and my lenses, diet pepsi, cake stand, etc. Let’s note that my room lights are OFF. Get the idea? :)
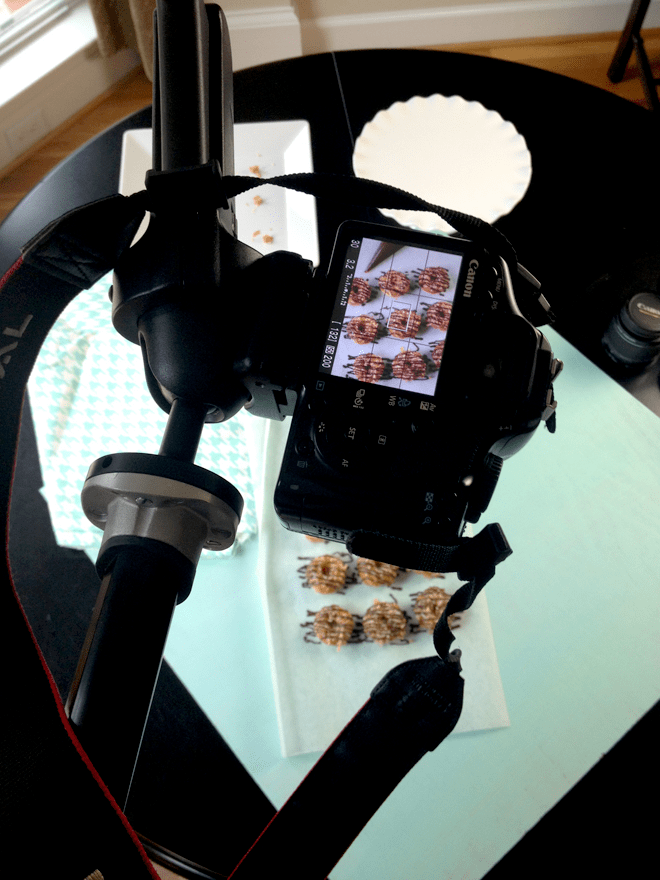 This is a post of the same set-up from above the camera. See? You don’t SEE the laundry, the piles of junk, etc. Ah, the beauty of close-up photography (full tablescapes are trickier for that reason). Now this is food but if you’re shooting PAPER GOODIES (I know some of you are out there), then I would remove the table from the equation. Lay down your background (large white foam board, ironed fabric, etc) and then lay down your paper goodies. Shoot overhead! Then I’d put some of your paper goods to use (put your food tent cards in folded style next to a plate of food and shoot it from a 45 degree angle). If you want more ideas like this — leave a comment below.
Editing: I use Photoshop to edit my photos. I try to take the best photo I can out of the camera to avoid relying on “post-process” because there can also come a time where it gets obvious that a picture has had a lot of “work” done to it (kind of like crazy botox ladies). I usually adjust my layers in Photoshop and that’s it. This is also where I add text overlays to my images. Sometimes I create collages here too. If you want to know more about post-processing, tell me in a comment below and I’ll write more about it.
Here is a quick pic of the shoot seen in this post. The rest + recipe for these will be coming soon.

P.S. Guess what? Diet Pepsi is giving away $50 gift cards for every 50 pins this post gets SO if you want to win a gift card – pin an image here and for every 50 we get, we’ll give away a gift card (check back here, when we get to 50, you can enter to win!)

Love it- Thanks for all of the tricks of the trade! Amazon should send you a thank you note after I go and buy all of the equipment mentioned. And the Anthro napkins, they are just a must, in general. xo
Hi sweet friend! You’re so welcome! Call me with ANY questions :) And yes, those anthro napkins ARE a must!
Great post! I’m one of those “paper goodies” people and my photo skills need a lot of work…thanks for sharing your process. :)
Hi Jenna! YAY! I love the paper goodies people, and glad you got some tips and ideas for shooting your work.
Thank you so much for sharing this! I am about to invest in the Canon T3 Rebel, based on all the good feedback I have heard. I would love to know more about your favorite props, how you DIY them, or where you like to buy them and maybe how not to “over do it” :). I would also LOVE to know more about your post process editing.
Hi! Thanks for this sweet note. You won’t regret the Canon Rebel! If others are also interested in DIY/propping/post-process, I’ll do a post on it! Stay tuned! :) p.s. your blog looks super cute!
Great tips :) I just got a Nikon dslr but haven’t used it much but I need to so I can learn to take pretty shots like you :) I would also like to learn more about props and post process.
Hi Courtney!
Thank you so much for sharing all this info! This is incredibly helpful! I would definitely love to see another post all about photo props!
Thiis post has been super useful – thank you for sharing!! I recently invested in a DSLR but I’ve yet to use it but am really excited to see what I can achieve with it. Please please please do a post on backdrops&props and editing – I could really use it! :-)
Great post except I don’t have a fancy camera, white box, etc. so my paper goods look BLAH. Any tips on using a regular Nikon camera?
Hi! Most of my tips involve getting the equipment (light box etc) because I too struggled without them. As for Nikon – is it a DSLR? That’s the 1st step. If it’s not, then I’m afraid I’m not much help as most of these tips are for DSLR. I didn’t shoot long in my 35 mm point-and-shoot.
Thanks Courtney! I’ve been wanting a tripod but was too overwhelmed to even know what to look for. I’ll give this one a try! Love your ideas!
Thanks for the great info Courtney! This is an area I want to get better in this year and you have provided some helpful tips. One question, when you make your own backdrop boards (like the one in the picture) what size do you make them?
They’re all over the place but I like at least 24×24 inches. It depends on what you’re shooting. These little donuts were small and the cake stand was small. Now, if I had shot straight on – it would have been a problem but I was shooting overhead or at a very strong downward angle so no one can tell that the board is quite small. I have some boards that are larger than my table-top. We can chat in full depth at Blissdom too if this is more confusing than helping :)
I JUST started using a tripod because I felt like it chained me down, too. I can’t believe I’ve wasted all these years *not* using one!! But now I think I’ll have to buy the Manfrotto!
Yes! It’s hard to get used to at first but now I’ll never go back. I struggle to shoot without it. I love Manfrotto!
Great Post Courtney! I use a Cannon EOS Digital Rebel XT with a Canon EF-S Zoom lens 18-55 mm for my “paper goodies” photos and could not live in dreary Ohio without my lighting. I found the Promaster LED Portable Studio Light VL306 at a photo store nearby. http://www.vanscamera.com/promaster-led-portable-studio-light-vl306-7907.aspx A great value and perfect for “paper goodies.” I do prefer natural light and set my settings on my camera to manual mode to achieve a brighter white and more natural photo. xoxo Happy Valentine’s Day!!! xoxo
This is SO awesome, thank you Courtney! I’ve been teaching myself photography too so thankfully this didn’t go flying over my head completely…. HA! AND I use a Canon 30D.
My question is: How often do you find yourself switching to the 100mm? I use my 50mm 1:8 most of the time and I’m wondering if I should invest in the 100mm. It is SO tempting! Especially when you want a crystal clear picture of that cupcake topper ;)
Hi Jasmine! This depends on what you shoot. If it’s food, I would say yes (that’s my take) because there will come a time when you want to see the sprinkles super close-up or that oozing chocolate or whatnot. For parties, it is similar since a lot of it is food. But super close-ups of paper goods, etc. I would say you could do without it for tablescapes but food – I like it. I would still say that my 50 mm f/1.4 is use 80% of the time. I’ve also heard that people love the 24-70 for cannon but that sucker is PRICEY.
I am about to purchase a DSLR and I am also going to start a blog featuring paper goods, so this was extremely helpful!!! If you could do a post on backdrops and props and on editing that would be awesome! I have PS6 but have no clue how to use it. I definitely need all the help I can get.
Hi Leigh! Great – I’ll add it down to my list to discuss. I have PS5 and there is not a big difference so any tutorials, screenshots, etc should be roughly the same on yours.
Thank you for this post! Awesome helpful information :)
And yes please…..would love more posts on everything – backdrops/props/Photoshop/style ideas etc etc etc! Thanks!
This is so helpful! I would love to hear more about props. I have difficulty staging my craft/food photos! Pinning this now!
Love the post Courtney! Having the right tools is a LIFESAVER!!!
Great post! Love following you on instagram and since starting my own boutique back in September, it’s great to hear the tips and tricks from the pros!
THANK YOU SO MUCH! I have a Canon Rebel T3i because of you…I asked months ago what kind of camera you used and you said a Canon Rebel…I LOVE my camera. Thanks!
great and helpful post, Courtney! I got a beautiful DSLR for my b-day and just took a one day workshop to learn how to use it. now i need tips for shooting dessert tables/tablescapes and for using photoshop. would love to see more photography posts!
It’s like you read my mind with this post! I’ve owned my Canon Rebel for a couple of years (I needed it to capture my super-fast and squirmy toddler), and I recently started a blog. Photography is something I’ve come to enjoy, but I also know that I lack a lot of knowledge about it. I know my camera and Photoshop just enough to be dangerous! Are you self-taught or have you taken any photography classes?
I would totally also recommend the 60mm f/2.8 macro lens if someone wasn’t looking for such a zoomed in lens like the 100mm but still wanted an amazing macro. I love all these tips and I really need to look into that tripod!! Thanks for the help Courtney!!
Envious of your tri-pod!!! I love that it can shoot directly overhead. A post on how you edit and add text to your pics would be awesome. Thanks for sharing!!!!
Thanks for the info very helpfull to a newbie. I wanted to get more info on post-process. I also wanted to know which version of photoshop are you using. I have elements 8or 9 and don’t know how to use it at all. Any info will be greatly appreciated.
This is a great post! Thanks for sharing all your knowledge :)
Loved this, thanks for sharing!
Hi Courtney, I loved this post! I am a beginning blogger whose photography needs a TON of work so this was so helpful. Thank you! Would love to see a post on props as well sometime.
Michelle
alittlemorelovely.com
wow I do love your pictures and the camera is $600+…yeah it will take great pictures. I am looking for a cheaper one or maybe check out the pawn shop.
So useful!!! Thank you for sharing your tips!
LOVE this post. Thanks for the tips. I got the canon rebel t3i and an extra lens for Christmas and it has changed my blog life. I wanna do so much more! ;)
xoxo
Love this…thanks and please post about post-processing!
Oh My Gosh!! Thank you!! Thank You!! Thank You!! I just purchased a Canon Rebel EOS T3i this weekend and was so disappointed with the lens it came with. Thanks for all your information.. Perfect for taking photos of my clothing on my boutique Lolibears Cottage. I love your posts!!!
Thank you SO much for this post, Courtney! Soooo useful!!! I’ve already learnt a lot just from this, but ANY more info and ideas about how you get such amazing photos would be great!
All the best from sunny Madrid,
Noelle (blog.fiestafacil.com)
Love this post! I would love to read a follow up post on ALL the things you mentioned. Lol :) props, posting, etc. Learned so much from this. Thank you so very much.
Amazing post! Such great info. And I would love to hear about ALL of the other things you mentioned! I take my own photos for my shop and blog and one of my 2014 goals is to really focus on my photography and learn more about my camera. Prop and post processing info would be awesome. Thanks! xo
Thanks for this post! Can you give further info on the editing?
I am so happy I came across your post in Pinterest. Made my day. I have been working on my photos – actually, I spend more time on photos than the post sometimes, just to get the shots as best as they can be. Thanks so much for sharing. I would really like if you could write about props and backgrounds.
Hi Courtney,
Will you have any followup posts such as these? I know myself and many others would love to hear more tricks of the trade.
Your recipes, posts and pictures are always inspiring.
Thanks!
Hi Joanna! What would you like to know?! Email me courtney@pizzazzerie.com if there is a specific request and I’ll try to get it posted (especially before this baby arrives, haha)!
I love to see these behind the scenes. Thanks for sharing!
Thanks Cris!
Found your post as looking to buy a Manfrotto tripod and head for food photography and wading through the technical jargon on most sites is not helpful. I always like to see other people’s set ups so this is really useful. Both tripod and head now on wish list but it looks like you are using an arm extension for the shot in the picture – if so could you say which one please. Thank you so much.
Forgot to tick the subscribe to replies box first time :)
Hi Sally! No extension was bought, the manfrotto tripod I have just has the ability to life up and over to do over-head shots!
Just wanted to say thanks so much for the amazing information! I also linked back to you in my blog post!
http://abcberry.blogspot.com/2014/06/my-blog-photography-wishlist.html
This post was just what I was looking for! I am trying to start a blog out of a college apartment so I don’t have a lot of space to keep equipment but the lighting is AWFUL so I need something to solve that issue. How easily do the light boxes break down and store?
I’m passing this idea off to my hubby, who photographs almost all of my blog pics! :) He’s a newer photographer and is always looking to improve his technique!
Just found this post. This is exactly what I needed!!! My 2016 goal is to improve my photography. Thank you!!! Love your work and how you want to share your knowledge!
Thank you for the sweet note!